# About This Document

This manual (help system) describes how to use this manual and the limitations related to the descriptions in this manual. Please be sure to read it carefully.

# Document usage

This section describes how to use this document (CGI Studio Documentation).

#### Structure of this document

This document consists of the following four levels.

<table id="bkmrk-selves-this-is-a-lar" style="border-collapse:collapse;width:100%;height:158.359px;"><tbody><tr style="height:35.3906px;"><td style="width:18.5803%;height:35.3906px;">Shelves</td><td style="width:81.5433%;height:35.3906px;">This is a large classification. It corresponds to the role of bookshelves in a library.

</td></tr><tr style="height:57.7812px;"><td style="width:18.5803%;height:57.7812px;">Books</td><td style="width:81.5433%;height:57.7812px;">This is a middle classification within the large category. It corresponds to the role of books arranged in the bookshelf, which is a large classification.

</td></tr><tr style="height:29.7969px;"><td style="width:18.5803%;height:29.7969px;">Chapters</td><td style="width:81.5433%;height:29.7969px;">This is a small classification that bundles the Pages placed in the Books, a middle classification.</td></tr><tr style="height:35.3906px;"><td style="width:18.5803%;height:35.3906px;">Pages</td><td style="width:81.5433%;height:35.3906px;">This is an actual document is described. Pages are classfied according to its usage by Chapters/Books/Shelves.

</td></tr></tbody></table>

When this manual is launched, a list of Shelves is displayed, and from Shelves, you can navigate to Books and Chapters/Pages as child hierarchies to browse the desired document.

#### User Interface

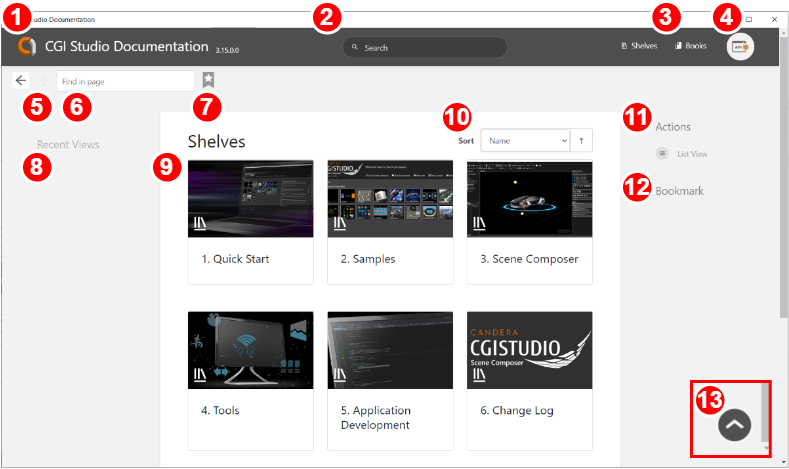
<div drawio-diagram="7239"><img src="https://doc316en.candera.eu/uploads/images/drawio/2024-11/drawing-4-1730431246.png" alt="drawing-4-1730431246.png"/></div>

<table id="bkmrk-1-search-field-perfo" style="border-collapse:collapse;width:100%;height:481.265px;"><tbody><tr><td class="align-center" style="width:9.39199%;">1</td><td style="width:23.5976%;">CGI Studio Documentation</td><td style="width:66.9857%;">CGI Studio Documentation button. Clicking this button will take you to the Shelves screen. At the right of this logo, the version of CGI Studio currently in use is displayed.

</td></tr><tr style="height:35.3906px;"><td class="align-center" style="width:9.39199%;height:35.3906px;">2</td><td style="width:23.5976%;height:35.3906px;">Search field</td><td style="width:66.9857%;height:35.3906px;">You can search the entire document for keywords. See <span style="color:rgb(230,126,35);">[Keyword Search](#bkmrk-keyword-search)</span> for more information.

</td></tr><tr style="height:35.3906px;"><td class="align-center" style="width:9.39199%;height:35.3906px;">3</td><td style="width:23.5976%;height:35.3906px;">Select button</td><td style="width:66.9857%;height:35.3906px;">You can select the content view style from Shelves or Books.

</td></tr><tr style="height:49.5938px;"><td class="align-center" style="width:9.39199%;height:49.5938px;">4</td><td style="width:23.5976%;height:49.5938px;">API document button</td><td style="width:66.9857%;height:49.5938px;">By clicking this button, a new window will open to display API documents. Note that this button will not be displayed if the API documentation is not available (a blank page will be displayed when you click the link to the API documentation item in the documentation).

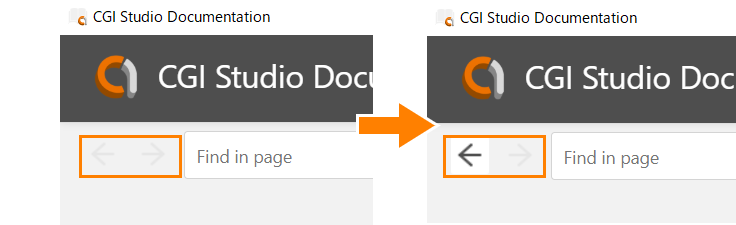
</td></tr><tr style="height:57.7812px;"><td class="align-center" style="width:9.39199%;height:57.7812px;">5</td><td style="width:23.5976%;height:57.7812px;">Back/Forward</td><td style="width:66.9857%;height:57.7812px;">Click this button to go backward or forward in the displayed content. When not in use (when no page movement has occurred), this button is greyed out.) See <span style="color:rgb(230,126,35);">[Document navigation](#bkmrk-document-navigation)</span> for more information.

</td></tr><tr style="height:35.3906px;"><td class="align-center" style="width:9.39199%;height:35.3906px;">6</td><td style="width:23.5976%;height:35.3906px;">Contents search</td><td style="width:66.9857%;height:35.3906px;">Performs a keyword search on the text currently displayed on the offline document screen. Search results are highlighted in yellow. See <span style="color:rgb(230,126,35);">[Contents search](#bkmrk-contents-search-%28cgi)</span> for more information.

</td></tr><tr><td class="align-center" style="width:9.39199%;">7</td><td style="width:23.5976%;">Bookmark registration button</td><td style="width:66.9857%;">When any content (Shelves/Books/Chapters/Pages) is displayed, click this button to add a displayed content to the Bookmark. When Bookmark is registered, the button turns blue.

</td></tr><tr style="height:57.7812px;"><td class="align-center" style="width:9.39199%;height:57.7812px;">8</td><td style="width:23.5976%;height:57.7812px;">Recent Views</td><td style="width:66.9857%;height:57.7812px;">Shelves, Books, and Chapters/Pages that you have viewed in the past will be listed. See <span style="color:rgb(230,126,35);">[Recent Views](#bkmrk-recent-views)</span> for details.

</td></tr><tr style="height:49.5938px;"><td class="align-center" style="width:9.39199%;height:49.5938px;">9</td><td style="width:23.5976%;height:49.5938px;">Content display area</td><td style="width:66.9857%;height:49.5938px;">Contents are displayed. When you navigate to a page, you will see the document.

</td></tr><tr style="height:102.562px;"><td class="align-center" style="width:9.39199%;height:102.562px;">10</td><td style="width:23.5976%;height:102.562px;">Sort</td><td style="width:66.9857%;height:102.562px;">Items displayed in the contents display area can be sorted by any criteria. The sorting conditions can be selected from "Name", "Created Date", and "Updated Date". You can also switch the sort order from descending to ascending by clicking the up/down arrows on the right side of the pull-down menu.

</td></tr><tr style="height:57.7812px;"><td class="align-center" style="width:9.39199%;height:57.7812px;">11</td><td style="width:23.5976%;height:57.7812px;">Actions</td><td style="width:66.9857%;height:57.7812px;">Switches the display style in the contents display area to List or Grid view. This section is displayed only when display Shelves or Books.

</td></tr><tr><td class="align-center" style="width:9.39199%;">12</td><td style="width:23.5976%;">Bookmark</td><td style="width:66.9857%;">Items registered using the Bookmark registration button will be displayed.

</td></tr><tr><td class="align-center" style="width:9.39199%;">13</td><td style="width:23.5976%;">Scroll up button</td><td style="width:66.9857%;">It will appear automatically when you scroll down the displayed content. Scroll up to the top of the page by clicking this button.

</td></tr></tbody></table>

#### Document navigation

Except in particular cases, Sleves is usually displayed. Navigate by clicking on the title of Books and Chapters/Pages to be viewed, in that order.

##### Scroll up button/Home Key operation

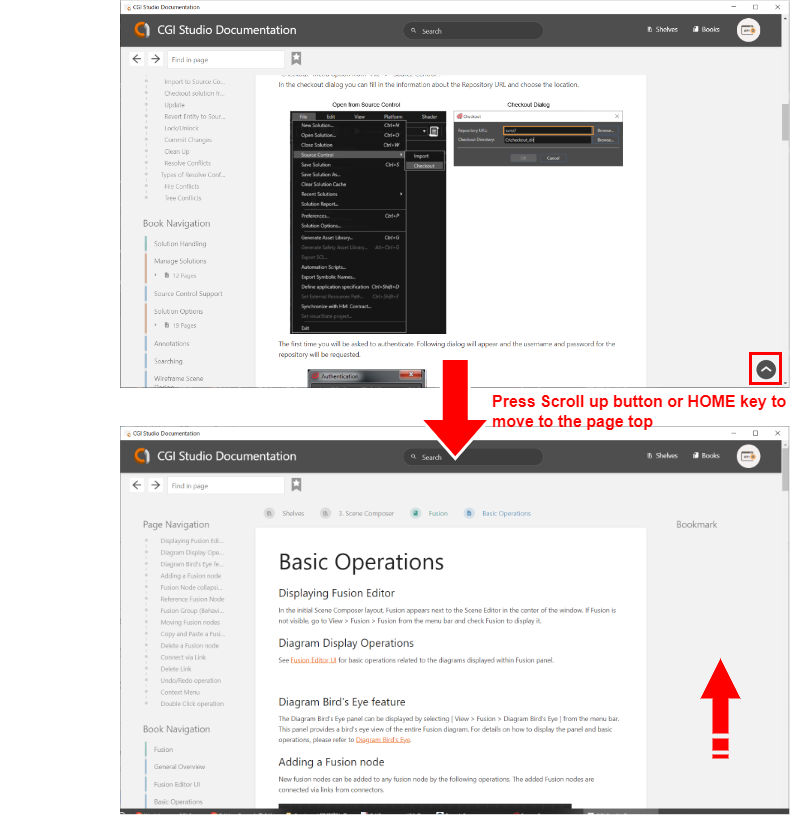
When viewing a document, press Scroll up button displayed in the lower right corner of the screen, or the Home key to go to the beginning of the currently displayed page. This will make it easier to access <span style="color:rgb(230,126,35);">[Breadcrumb](#bkmrk-breadcrumb)</span>, <span style="color:rgb(230,126,35);">[Back/Forward buttons](#bkmrk-back%2Ffoward) <span style="color:rgb(0,0,0);">and the <span style="color:rgb(230,126,35);">[S](#bkmrk-keyword-search)</span></span>[earch field](#bkmrk-keyword-search)</span>.

<div drawio-diagram="5846"><img src="https://doc316en.candera.eu/uploads/images/drawio/2024-05/drawing-4-1716861608.png" alt="drawing-4-1716861608.png"/></div>

##### Bookmark

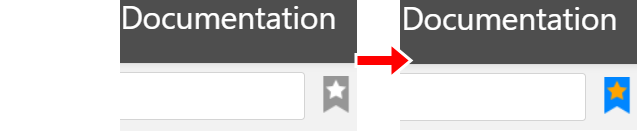
By clicking on the Bookmark registration button, you can register the currently displayed content in the Bookmark field. If the currently displayed content is not yet registered as a bookmark, its color is gray. When the content is registered (by clicking on the Bookmark registration button), the color changes to blue.

<div drawio-diagram="5845"><img src="https://doc316en.candera.eu/uploads/images/drawio/2024-05/drawing-4-1716816220.png" alt="drawing-4-1716816220.png"/></div>

##### Breadcrumb

When you move through the hierarchy, the path to the current display location is shown at the top of the content display area. To go back in the hierarchy, click on this path.

<div drawio-diagram="4749"><img src="https://doc316en.candera.eu/uploads/images/drawio/2023-11/drawing-4-1700024621.png" alt="drawing-4-1700024621.png"/></div>

##### Recent Views

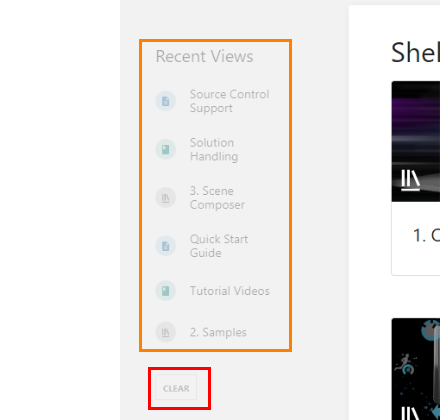
When you return to Shelves, your browsing history will be displayed on the left side of the screen, showing the books/chapters/pages you have moved to. By clicking anywhere in there, you can move to the target location. You can delete the entire browsing history by clicking the \[ CLEAR \] button at the bottom of Recent Views.

<div drawio-diagram="4751"><img src="https://doc316en.candera.eu/uploads/images/drawio/2023-11/drawing-4-1700024867.png" alt="drawing-4-1700024867.png"/></div>

##### Page Navigation/Book Navigation

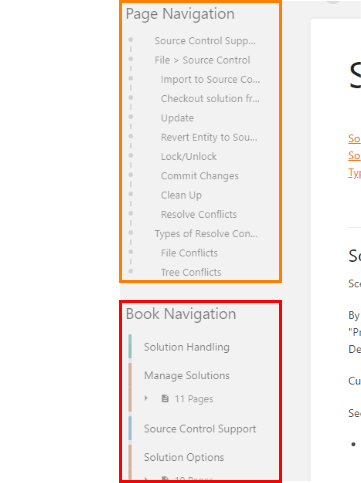
On Pages view, Page Navigation/Book Navigation is displayed on the left side of the screen.

<div drawio-diagram="4750"><img src="https://doc316en.candera.eu/uploads/images/drawio/2023-11/drawing-4-1700024726.png" alt="drawing-4-1700024726.png"/></div>

- - - - - Page Navigation displays a list of headings on the currently displayed page. By clicking on any heading, the article will move to the corresponding location.
                - Book Navigation displays a list of other Chapters/Pages in the book that contains the currently displayed page. Clicking on any Chapters/Pages title also switches the display to the corresponding location.

By moving the mouse cursor over the page body or Page Navigation/Book Navigation, the display can be scrolled up and down respectively.

##### Back/Foward

By clicking the "Back/Forward" button in the upper right corner of the screen, you can go back or forward through the content displayed on the screen based on your viewing history. If there is no page transition history, this button will be greyed out.

<div drawio-diagram="7219"><img src="https://doc316en.candera.eu/uploads/images/drawio/2024-10/drawing-4-1730340040.png" alt="drawing-4-1730340040.png"/></div>

#### Keyword Search

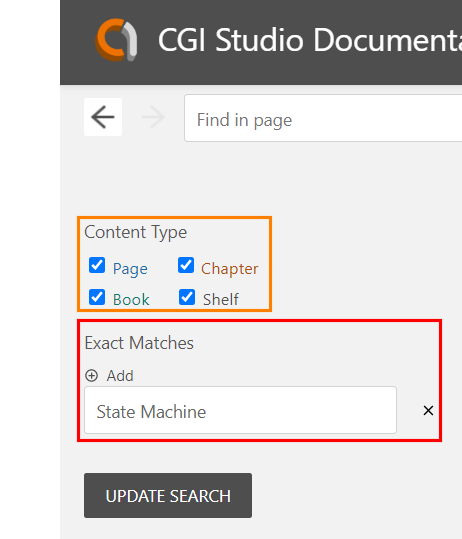
You can search for keywords by entering any string of text in the search field at the top of the document and pressing the Enter key. Up to 10 search results will be displayed. If there are more than 10 results, click the page number button at the bottom of the search results screen to display them. In addition, on the left-hand side of the search results page, there is \[ Content Type \] and \[ Exact Matches \] section, and by using these functions, you can narrow down and display the search results.

<div drawio-diagram="7220"><img src="https://doc316en.candera.eu/uploads/images/drawio/2024-10/drawing-4-1730340508.png" alt="drawing-4-1730340508.png"/></div>

##### Content Type

Keyword searches are performed for all categories (Page/Chapter/Book/Shelf). Therefore, you can narrow down your search to only those results that belong to the target category by re-selecting the category from the \[ Content Type \] field displayed on the left side of the search results screen and clicking \[ UPDATE SEARCH \]. (Orange-colored box in the above image)

##### Exact Matches

To perform a regular expression search, enter keywords here and click \[ UPDATE SEARCH \]. Only the pages that match the keywords you enter will be displayed in the search results. To use this function, click the \[ Add \] button to display the search field and enter keywords. You can delete the target search field by clicking the \[ X \] button to the right of the search field.

On the other hand, in the Search field, performing a regular expression search by enclosing the search keywords you enter in double quotation marks.

<div drawio-diagram="7221"><img src="https://doc316en.candera.eu/uploads/images/drawio/2024-10/drawing-4-1730341006.png" alt="drawing-4-1730341006.png"/></div>


#### Contents search

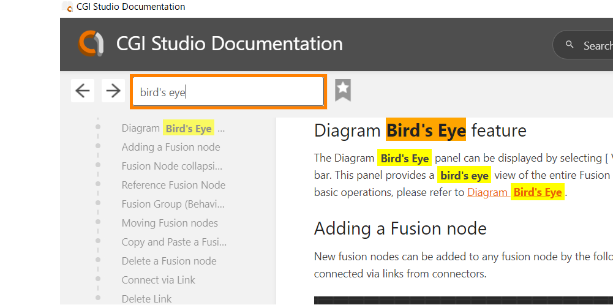
Search for keywords in the displayed contents. As you enter keywords, the keywords you entered will be highlighted in yellow (all text in the screen will be searched for).

- Pressing the Enter key moves the input keywords (keywords that are currently displayed are highlighted in orange).
- Press Shift+Enter to move the input keywords in reverse order.
- Press Ctrl+F to move to the content search field.

<div drawio-diagram="5847"><img src="https://doc316en.candera.eu/uploads/images/drawio/2024-05/drawing-4-1716862414.png" alt="drawing-4-1716862414.png"/></div>

#### Feedback

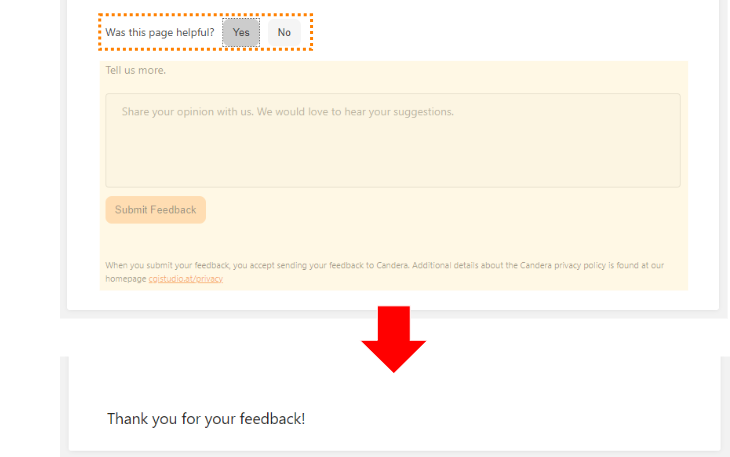
At the bottom of each page is a feedback function. You can send us your comments directly about the content of the pages, such as the one below.

- The description was very clear.
- The description was not clear enough for me to understand the details of the feature or how to use it.

You can submit your feedback by following the steps below.

1. At the bottom of the page, click the "Yes" or "No" button to the right of "Was this page helpful?
2. The "Tell us more" area (shown in the yellow area below) will appear.
3. In the text entry area, enter your opinion on whether or not you found the information useful.
4. Click the "Submit Feedback" button at the bottom of the text entry area. 
    - Your feedback will be sent to Candera.
5. The currently displayed feedback input area will disappear. 
    - If successful, the message "Thank you for your feedback" will be displayed.
    - Otherwise, "Sorry, connection to the server timed out." will appear if it cannot connect to the server.

<div drawio-diagram="4748"><img src="https://doc316en.candera.eu/uploads/images/drawio/2023-11/drawing-4-1700023723.png" alt="drawing-4-1700023723.png"/></div>

#### Callouts

In this document, statements that require special attention are indicated by the following two types.

<p class="callout info">Use for an information that should be conveyed incidentally in operations and configurations.  
</p>

<p class="callout warning">Use for an information that should be required an attention in operations and its configurations.</p>

# Note on the contents

All information in this document is subject to change or deletion without notice. The information contained herein is current as of the date of Release. Please note that the information may differ from the latest products and conditions.

# Docs Agent

The Docs Agent is an AI-powered chatbot designed to accelerate your search within the CGI Studio documentation. The conversational assistant can:

- Summarize long documentation pages
- Connect concepts across different pages
- Point you to specific tutorials

#### How to Access

Click the **Docs Agent** icon at the bottom right of the screen (red box in the figure) to open the chat window (orange box).
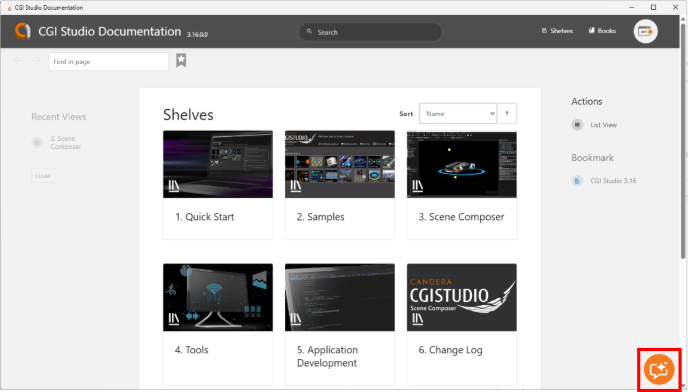
<div drawio-diagram="8789"><img src="https://doc316en.candera.eu/uploads/images/drawio/2025-11/drawing-4-1763624529.png" alt="drawing-4-1763624529.png"/></div>

#### How to use

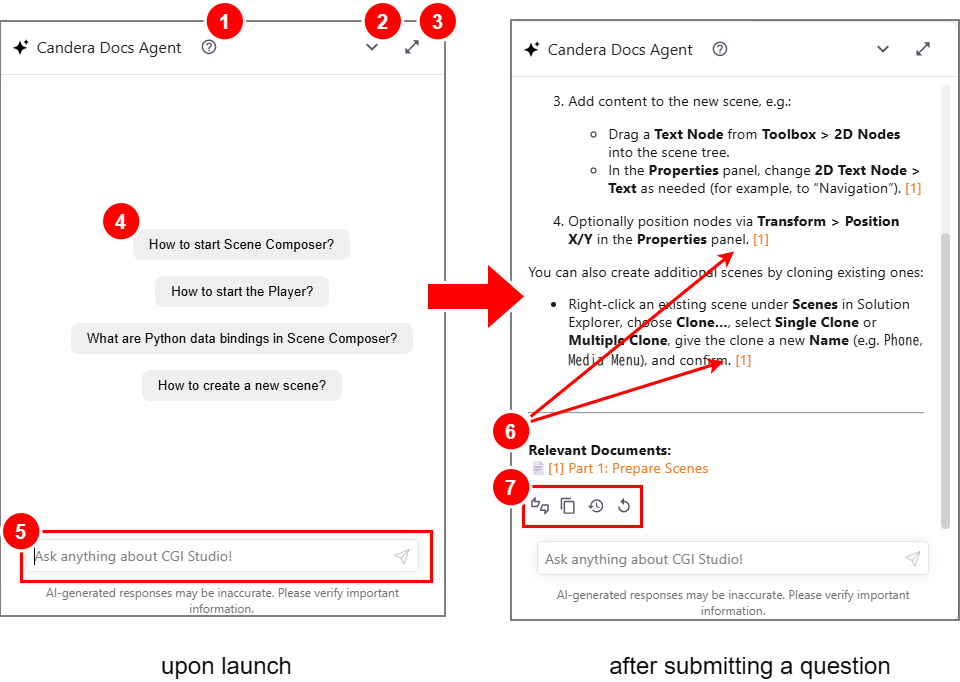
Clicking the **Docs Agent** icon described above opens a chat window on the documentation page. Here, we explain the UI of the initial screen shown immediately after launch and the screen where an answer is displayed after you submit a question.

<div drawio-diagram="8954"><img src="https://doc316en.candera.eu/uploads/images/drawio/2026-02/drawing-4-1771325875.png" alt="drawing-4-1771325875.png"/></div>

<table id="bkmrk-1-help-button-%C2%A0-a-he" style="border-collapse:collapse;width:100%;height:288.906px;"><colgroup><col style="width:5.24377%;"></col><col style="width:18.7418%;"></col><col style="width:76.1228%;"></col></colgroup><tbody><tr style="height:109.148px;"><td class="align-center" style="height:109.148px;">1</td><td style="height:109.148px;">Help button</td><td style="height:109.148px;">A **Help** menu is available in the top bar of the Docs Agent window. From there, you can open the following information:

- **Help**: Displays overview information about Docs Agent.
- **Privacy Policy**: Launches a web browser and displays the <span style="color:rgb(230,126,35);">[privacy policy](#bkmrk-privacy)</span> information.
- **Third-Party**: Displays third-party information (such as licenses).

</td></tr><tr><td class="align-center">2</td><td>Minimize button</td><td>Clicking this button closes the Docs Agent window.

</td></tr><tr><td class="align-center">3</td><td>Maximize / Restore button</td><td>Clicking this button maximizes the Docs Agent window. Click it again to restore the window to its original size.

</td></tr><tr style="height:46.5057px;"><td class="align-center" style="height:46.5057px;">4</td><td style="height:46.5057px;">Suggested prompts</td><td style="height:46.5057px;">Before you enter a custom prompt, suggested prompts are displayed. Clicking a suggested prompt inserts its content so you can ask a question immediately. </td></tr><tr style="height:29.7017px;"><td class="align-center" style="height:29.7017px;">5</td><td style="height:29.7017px;">Chat input field</td><td style="height:29.7017px;">Enter your question in the chat input field and press ENTER to receive a response from Docs Agent.

</td></tr><tr><td class="align-center">6</td><td>Relevant Documents</td><td>Links to the documentation pages that Docs Agent referenced when generating the answer are shown. The numbers at the end of the answer indicate the corresponding source links as reference numbers. Clicking a number opens the associated source link and displays the referenced documentation page.

</td></tr><tr style="height:103.551px;"><td class="align-center" style="height:103.551px;">7</td><td style="height:103.551px;">Action button</td><td style="height:103.551px;">Action buttons are displayed below the response from Docs Agent.

- **Give feedback on last response:** Send your feedback on the document content.
- **Copy to clipboard**: Copies the response to the clipboard.
- **Clear history**: Clears the chat history.
- **Retry last response**: Re-runs the most recent question.

</td></tr></tbody></table>

<p class="callout info">While the agent is optimized for accuracy, AI responses can occasionally be incorrect or misleading. Before proceeding with any implementation, always use the **source links** (see figure) to review the original article.</p>

#### Troubleshooting

If the Docs Agent icon is not visible, please check your internet connection or firewall settings. Occasionally, temporary service interruptions may also prevent the agent from loading.

#### Privacy

For privacy-related information, open **Privacy Policy** from the **Help** menu at the top of Docs Agent. When you launch Docs Agent for the first time, you will be asked to agree to the privacy policy. Unless you agree, no user data will be sent for external processing.